} -->

Monday, April 26, 2010

Taking a Break

I have lots of stuff going on until school is out.
  • Chemistry Subject Test
  • SAT
  • AP US History Test
  • AP Language Test
  • AP Chemistry Test
  • Hutton Carnival Volunteer
  • Lilac Band Parade plus tons of practices
  • Golf
As you can see my schedule is jam packed. I don't have a free weekend till the week school ends.

This will slow my progress on the car, and i wont have much to update.

Sunday, April 18, 2010

Sold the Starter

I sold the starter for $20

Thursday, April 8, 2010

Plan

I have four things to do before i purchase the rest of my EV stuff.
  1. Build the controller: I'm in no hurry for this since i want to do it right, so its not a top priority. I would guess ill have it done before school is out.
  2. Figure out the batteries i want to use. 15 8v golf cart batteries will get me my desired 120 volts. My other options are 20 6v or 10 12v. The thing with batteries is the more you have is more range before recharging, but also more weight. 20 6v would equate to 1200 lbs since they are 60 lbs each, and i would get maybe 5 extra miles of range. 10 12v would be close to 750 lbs, but i would suffer about 10 miles less of range. 8v howevr are the middle ground, weighing about 63 lbs each, so about 950 lbs, and i would get decent range.My delima is choosing which brand of 8vs to use. Sams Club offers a great deal on decent quality btteries for about $70 each, the problem is the nearest one is in Seattle. So ill need to research that a bit more. The batteries i will buy last, since they lloose life sitting in my garage.
  3. I need to test the existing electrical stuff and fix whats broken. This includes the headlights, dishboard, turn signles, wipers ect. I need to buy a reguilar car battery for this. Im hoping to finish this by May.
  4. Purchase, mount, and test motor. I already have arranged a great deal on a new moter from a guy i visited in Seattle. I will need to pick that up, since it is $200 to ship, and order the custom adapter plate which will connect is to the transmission. Once i've done that, i need to figure out a good way to mount it all under the hood and connect it to my controller. It shouldnt be too hard since it is much smaller than the gas engine. Once it is all mounted, i can text the motor with a 12v battery, and actually get the car moving (super slow).
After all of this is done, I can proceed on and purchse all of the liitle components to wire it all together. That will be the final stretch of the project.

I plan to finish sometime in the middle of summer, and then it will just be some tidying up and optimizing to get it perfect.

Nevertheless, the final product is very far out of reach right now.

Saturday, April 3, 2010

Today's Accomplishments

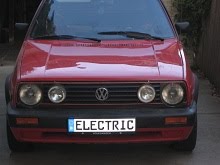
Today, I woke up excited to put on the newly assembled Quad Grill on the car. Here is what it looked like

Everything fit in great!!

Next i re-finished everything plastic and back on the exterior using Kiwi Leather Dye.

In about 4 hours i cleaned, removed the oxidation, and applied the Kiwi on the rear bumper, my two front bumpers, the mirriors, wheel arches, trim, grill and handles.

I applied 2 coats to get rid of some of the streaks.

Here are the results. It turned out great. Everything black looks new. The next step is to buff up the paint


Re-blackening Project

My bumpers, trim and wheel arches are nearly ash grey, and should be black.


After a bit of research, i found out the best fix resides in black leather shoe dye, specifically Kiwi


You basically apply it like paint, but it soaks into the old plastic, instead of creating an additional layer like paint would. The paint would not stick well since the bumper has been oxidized after years of being in the sun.

Ill post pictures when i finish my little science experiment

Headlight Assembly

Over hours of scratching my head, i finally got the headlight assembly set up.

Caylee cleaned it all too
  1. I chose which VW badge i liked better. I went with the chrome
  2. I screwed the 7" Lights into the core support. The screws swivel, so it was kinda funky figuring out how the go in.
  3. I took the grille and screwed in the 5" inner fog lights. I used the same method as when installing the 7" ones
  4. I mounted the grille on the core support
  5. The next step is to install them in the car and wire it all to a switch


Controller Kit Details

This kit has over 200 pieces and there is a ton of room for error. Im going to try to get help from an electric engineer.

Basically all im doing is soldering tons of components to a circuit board, then bolting together the housing. Seems easy, but its not

Here are some pics of it still packaged...