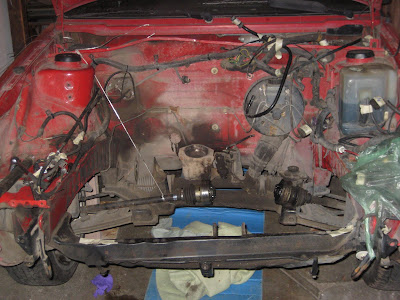
I was getting tired of all the extra connectors and wires that originally hooked to the engine, so i decided to remove them and tidy up the wiring i needed to keep. The only wires i have left are for the various lights and signals, the horn, ground, and the battery. Much more simpler.
Before:
After:
Showing posts with label clean. Show all posts
Showing posts with label clean. Show all posts
Tuesday, March 15, 2011
Wednesday, July 28, 2010
Finished Buffing
I've worked a couple hours daily the last week buffing and waxing the car. I've also touched up the paint in some areas that needed it.
This is the gear i used
Basically I started with Meguires 83 and the white more aggressive pad and applied it to the whole car twice. This re blended and shined the paint, but left swirl marks. To remove swirl marks i used the blue less aggressive pad and Meguires 9, which i also applied twice. After that i hosed off the car and cleaned the windows and trim.
There were a few deep scratches that i filled in with touch up paint and now you cant even see them.The only issue with the process is it stained my bumpers that i re blackened, so ill have to do that a gain. That will only take a few minutes
Here was the hood before
...and after
Saturday, April 3, 2010
Re-blackening Project
My bumpers, trim and wheel arches are nearly ash grey, and should be black.
After a bit of research, i found out the best fix resides in black leather shoe dye, specifically Kiwi
You basically apply it like paint, but it soaks into the old plastic, instead of creating an additional layer like paint would. The paint would not stick well since the bumper has been oxidized after years of being in the sun.
Ill post pictures when i finish my little science experiment
Headlight Assembly
Over hours of scratching my head, i finally got the headlight assembly set up.
Caylee cleaned it all too
Caylee cleaned it all too
- I chose which VW badge i liked better. I went with the chrome
- I screwed the 7" Lights into the core support. The screws swivel, so it was kinda funky figuring out how the go in.
- I took the grille and screwed in the 5" inner fog lights. I used the same method as when installing the 7" ones
- I mounted the grille on the core support
- The next step is to install them in the car and wire it all to a switch
Saturday, March 20, 2010
Gutted and Cleaned the Interior
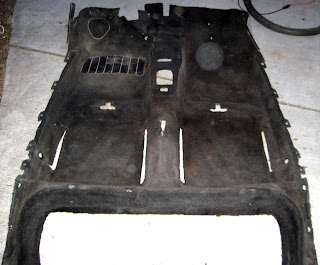
Today was a beautiful day, so i decided to tackle the interior. My goal was to get the carpet completely out.
To do so i had to remove just about everything else until the car was only metal. I then took a warm sponge and cleaned the red metal til it shined. This process took me about 5 hours
To do so i had to remove just about everything else until the car was only metal. I then took a warm sponge and cleaned the red metal til it shined. This process took me about 5 hours
Gutted Trunk
Front of Car (before)
Gutted (after)
Here is the carpet. It was a like a maze figuring out how to get it out
Sunday, March 14, 2010
What i did today
- Replaced the passenger door handle
2. Separated the Cylinder Head from the Engine
3. Removed the lower dash so i could access the relay panel
4. Sold all of these parts to someone
5. Removed and cleaned the gas tank (gross)
6. Borrowed the neighbors power washer and washed the car and all the parts
Cleaned transmission (before)
After!
I was amazed at how cleans things got, ecspecially after 20 years of grime
Saturday, March 13, 2010
Break Down of the Fuel Pump Assembly
I cleaned this gasoline drenched fuel pump and then took it apart to learn how it worked
It looks like this:
Sunday, February 21, 2010
Update...
Obviously i didn't get everything done that i wanted. I started cleaning under the empty hood and i also cleaned about half of the engine. It's harder than i thought!
Oven Cleaner works good on the metal components of the engine and Simple green works on on the painted stuff.
I moved my checklist to the side of the screen and will update it often, as i am eager to cross things out.
I wasn't planning on getting those parts, but im glad i did. I found two new local contacts who both have tons of parts.
Oh and i got that catalog grandma. Its great it has almost every part in it!
The only parts i still need for my car that don't involve the electric components are a new quad headlight assembly which im searching for used for around $120.
Saturday, February 20, 2010
Cleaned Some Parts
Today i cleaned a few parts using Simple Green and a tooth brush. They were pretty dirty, but now they are ready to sell. I already have a few offers for stuff.
Alternator (left)
Alternator (right)
Charcoal Canister
is used to trap the fuel vapors. The fuel vapors adhere to the charcoal, until the engine is started, and engine vacuum can be used to draw the vapors into the engine, so that they can be burned along with the fuel/air mixture.
Idle Stabilizer Valve
A device used to control the amount of air for engine operation at idle.
Subscribe to:
Posts (Atom)


